Many times I have shared great fishing trips with friends that catch tarariras, or wolf fish, with lures, and the only way to get similar results to theirs is by using flies that are actual lures adapted to be cast with fly-fishing rods. From the 30s to the 70s an amazing set of cork and hair design View more...Many times I have shared great fishing trips with friends that catch tarariras, or wolf fish, with lures, and the only way to get similar results to theirs is by using flies that are actual lures adapted to be cast with fly-fishing rods. From the 30s to the 70s an amazing set of cork and hair designs existed, we could call these: fly-fishing lures, which then vanished because of the hard work and low profitability these represented.Fly fans then lost these designs that served well when fishing for species that would not take a dry or a Yorkshire County spider. We should not forget that the fly-fishing outfit preceded the bait casting and spinning ones for almost 2000 years, and it was used for not only feather and hair flies but for natural bait and other kinds of imitations. As time went by, fly-fishermen kept refining their pastime, setting rules for each style of fly-fishing so every fish had its “etiquette and protocol”. The tararira is the ideal fish to experiment with and bring back old creations that are fun to tie, but also fun to fish with in any puddle where these invaluable childhood friends can be found.The Snake Frog mixes things from the past with modern foam flies. It is lighter than cork or balsa wood, it is easy to tie and it has an attractive water action. I tie it in several colors, even red and white, but the green and black combination is my favorite. Now I am no longer scared to leave my baitcasting or spinning rod home. The Snake Frog and others are the best players for those matches that we need to tie.
Move the mouse over the image to zoom in the fly.
Touch the image to zoom in the fly.

List of materials
Tying MaterialsHook: any long shank hook for poppers or saltwater flies. In this particular case, I’m using a straight Worm Hock type hook, size 3/0.Thread: white Uni Cord 3/0 or 7/0, or light-colored Kevlar; and 6/0 or 8/0 normal thread, white or cream colored.Foam: foam strap or EVA, chartreuse color, of 4 mm. of thickness and 12 mm. of width. Its length should be that according to the hook.Legs: chartreuse or barred green rabbit strap, and green spotted silicon rubbers.Dubbing: Ice Dubbing View more...Tying MaterialsHook: any long shank hook for poppers or saltwater flies. In this particular case, I’m using a straight Worm Hock type hook, size 3/0.Thread: white Uni Cord 3/0 or 7/0, or light-colored Kevlar; and 6/0 or 8/0 normal thread, white or cream colored.Foam: foam strap or EVA, chartreuse color, of 4 mm. of thickness and 12 mm. of width. Its length should be that according to the hook.Legs: chartreuse or barred green rabbit strap, and green spotted silicon rubbers.Dubbing: Ice Dubbing or similar, fluorescent or shiny green.Belly: rabbit strap, like the one used for the legs.Front legs: six green spotted silicon rubber strands.Eyes: lead or bronze, red with a black pupil.
Steps
Step 1
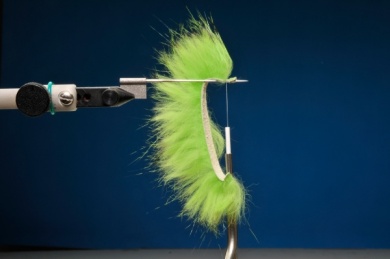
Place a thin needle on the vise and set the tying thread, adding some cyanoacrilate. Use any 6/0 or 8/0 normal, white or cream color fine thread. Tie the rabbit strap with six turns. Peel the strap a bit so there is no disturbing hair where we tie the thread. The hair should head to the right side of the picture, so the hair that was forced to the left does not disturb if we comb the strap hair again. View more...Place a thin needle on the vise and set the tying thread, adding some cyanoacrilate. Use any 6/0 or 8/0 normal, white or cream color fine thread. Tie the rabbit strap with six turns. Peel the strap a bit so there is no disturbing hair where we tie the thread. The hair should head to the right side of the picture, so the hair that was forced to the left does not disturb if we comb the strap hair again.
Step 2
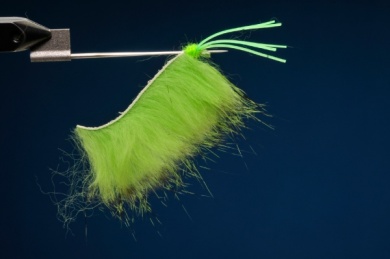
On the opposite side, tie five or six silicon rubber strands. Reinforce the tying with some cyanoacrilate, then hide the thread by using some shiny dubbing (Ice Dubbing or similar). Then, finish by tying it so that the dubbing is glued, and our back leg is ready.
Step 3
The two finished legs with its hair heading in the correct direction. For a 3/0 fly, the back legs should be about 5 centimeters long. To take each finished leg off the needle we should grab them tightly right where we tied the legs as we turn in one direction and the other. The tying will loosen from the needle and we will be able to take the leg off easily.
Step 4
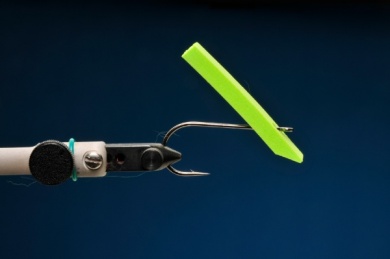
The picture shows the foam strap with a small hole with the hook going through it. We can also see the correct angle of inclination (45°) that the front of the fly will have. It should be cut with a new cutter so the cuts are clean. Try different angles to see how the fly undulates. The cutting angles do not have to be precise but some angles and length of the front part of the fly will make it undulate resembling a natural in a better way. View more...The picture shows the foam strap with a small hole with the hook going through it. We can also see the correct angle of inclination (45°) that the front of the fly will have. It should be cut with a new cutter so the cuts are clean. Try different angles to see how the fly undulates. The cutting angles do not have to be precise but some angles and length of the front part of the fly will make it undulate resembling a natural in a better way.
Step 5
Combine some thread with Uni Cord or Kevlar making a small dubbing ball on the back of the hook. Then tie two legs at each side. Tie the foam right before the legs, making sure the foam length is enough to reach the hook eye later (without stretching it). It’s better to tight the turns softly so the foam does not cut (you can try this before with another piece of foam). Once the foam has been tied, add some cyanoacrilate at the base, where the foam touches the hook. View more...Combine some thread with Uni Cord or Kevlar making a small dubbing ball on the back of the hook. Then tie two legs at each side. Tie the foam right before the legs, making sure the foam length is enough to reach the hook eye later (without stretching it). It’s better to tight the turns softly so the foam does not cut (you can try this before with another piece of foam). Once the foam has been tied, add some cyanoacrilate at the base, where the foam touches the hook.
Step 6
Tie and wrap a rabbit strap towards the front without reaching the hook eye, use regular rabbit, not cross-cut, to make it bulkier. The front legs are made by tying 5 or 6 silicon rubbers so these hung at each side, as shown in the picture. Finish with a knot, add some cyanoacrilate and let it dry, then place down the foam. If you want an indestructible fly, comb the rabbit down and apply some 5-minute dry epoxy before placing down the foam. Wait until it is dry; ten minutes should be enough. View more...Tie and wrap a rabbit strap towards the front without reaching the hook eye, use regular rabbit, not cross-cut, to make it bulkier. The front legs are made by tying 5 or 6 silicon rubbers so these hung at each side, as shown in the picture. Finish with a knot, add some cyanoacrilate and let it dry, then place down the foam. If you want an indestructible fly, comb the rabbit down and apply some 5-minute dry epoxy before placing down the foam. Wait until it is dry; ten minutes should be enough.

Step 7
Lower the foam carefully and set it at the hook through the small hole. Do not stretch it because it may cut. Hold it tight with your fingers against the back and push it forward. Place it at the hole and, with the strong thread again, tie the medium-sized lead or bronze eyes (red eyes are more noticeable). Lift the foam a bit to apply some cyanoacrilate that will stick to the epoxy on the rabbit. Press the foam against it so it sticks well. You can use some cyanoacrilate or 5-minute epoxy for t View more...Lower the foam carefully and set it at the hook through the small hole. Do not stretch it because it may cut. Hold it tight with your fingers against the back and push it forward. Place it at the hole and, with the strong thread again, tie the medium-sized lead or bronze eyes (red eyes are more noticeable). Lift the foam a bit to apply some cyanoacrilate that will stick to the epoxy on the rabbit. Press the foam against it so it sticks well. You can use some cyanoacrilate or 5-minute epoxy for the eyes section too, so it lasts longer after several fish attacks. Use a permanent marker to draw some marks and the fly will be ready to dance.


